Today's Design is . . .
ADORABLE HALLOWEEN!!! Hello lovelies! I know it has been a while since I made a post and I apologize. I was really sick this past week and didn't want to do anything. But! Now I am home in Texas visiting my parents and my mom wanted me to do her nails. So we decided to go with something simple and cute (She works at an elementary school, so nothing too scary!)
 Finger Paints: Prints and Printsess
This is the polish I use for ALL my Halloween oranges. It is bright and shinny but it is obnoxious.
As always we are gonna start with a good layer of base coat. Seriously, use it. Women are always getting frustrated because their at home manicures don't stay very long. When I ask them if they use base coat they say "No, I don't have time for that." In my head I am thinking "If you have time to gripe about your nails and have time to re-do them every three days, you have time for base coat." So DO IT!!!
Once that dries two coat of the Print and Printsess should do the trick!
With this design each nail is going to be something different. So I will do a finger by finger explanation of what I did.
Pinkey:
All this is is a spider web. You make three longer lines going diagonally across your nail. Then you just make slightly curved lines connect to the longer lines. Spider webs are really easy, so don't be scared.
Ring:
Pumpkins! The staple of Halloween. All you do is make two evenly sized triangles and a zig-zag line across the bottom! Super easy :)
Middle:
BOO! OH NO! SCARY WORDS!!! Some people freak out when it comes to words on your nails. They aren't any different then a triangle or a heart. They are just shapes. All you have to do is treat it like a drawing and you will be fine!
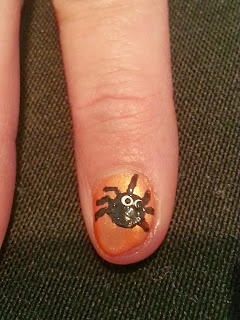
Pointer:
The spider is probably my favorite part. He is just so cute!! This one is a little more complicated because it has a bunch of steps. First, make a circle big enough to have legs. Second, don't worry about being anatomically correct. Third, make three short lines coming off of both sides. Fourth, on the end of the short lines add another short line pointing down, this makes him look distinctly spider-like.
Fifth and Sixth, add two white dots for eyes and then little black dots on the inside of those.
Thumb:
This is every kids favorite part of Halloween. CANDY!! Just like the spider make a big circle in the center. The do V's coming out of the sides, connect the V's and color them in. Then two lines for some wrapper color. This can be done with any color for any time/event/celebration/candy dependent holiday.
At the end of the day it all comes together and makes this!!!
Happy Halloween!!!!
Thanks for reading, I wish you all the luck in the world with your nail endeavors! Leave a comment and let me know what you think! Or give me a like if you read this off facebook. I shall post something else eventually :)


No comments:
Post a Comment